
Best Master CapCut Free Video Editor – EPIC Tutorial for Beginners
 For all latest news, follow The carefulu Google News channel.
Best Master CapCut free video editor – EPIC Tutorial
Best CapCut is arguably the best free video editor for seamless work with TikTok. If you’ve seen videos going viral on TikTok, many of them are using certain effects and filters that you can find in CapCut. But you can use it for almost any kind of video project. It is a very flexible, easy-to-use video editor.
The app is very popular and can be used on iPhone, iPad, Android, and desktop, pc computers.
I’m going to show you how to make the most of the awesome features, tools, and effects available in the app. Plus, there will be tips on how to streamline your video editing process. By the end of this tutorial, you will have all the knowledge and skills you need to create amazing videos using CapCut.

So, let’s get started and take your video editing skills to the next level!
I’ll be using an iPad for this tutorial because it has a larger screen, but the process is going to be the same on both iOS and Android.
How does CapCut work?
Like other video editing apps, CapCut is a software program that allows users to create and edit digital videos on their devices such as smartphones or computers. Capcut is available for your iPhone, Android, Mac, and Windows computers and you can also use it online using a web browser. So it makes a very versatile editing program.
CapCut offers a variety of tools and features that help users cut, crop, trim, add effects, and enhance their videos.
You can import your video footage into a project from your camera roll or external device. Once the footage is in the app, you can start editing it using the tools provided. These may include basic tools such as trimming and cropping or more advanced tools such as color correction and noise mixing.
For example, you can use the trimming tool to cut out unwanted parts of the video or use the cropping tool to change the aspect ratio of the video. You can also add text, transitions, and other effects to make your video more interesting
CapCut lets you take raw footage and turn it into a polished and professional-looking video. When you’re done, you can share it on various platforms like YouTube, Instagram, and TikTok.
How to start a CapCut project
When you open CapCut, you will have the big blue New Project button.

Above that is a row of buttons that you can use to access other features.
The camera lets you record videos through your device’s camera using the same interface as TikTok.
Captions to add captions.
Touch again to add a beauty mode style effect to a person’s face.
Autocut for editing a video using AI.
The prompter scrolls text that you can read while talking to the camera.
For now, we’re just going to look at the video editing features.
Tap New Project and then select one or more video clips from your media library For now, I’m going to pick 3 clips to start with. Note the numbers as you select clips. This is the order in which they will be arranged on the timeline.

Also, the project will be set up based on the first clip you choose.
Ok, let’s see the main interface of the editing app.
CapCut interface overview
Now we have the main CapCut interface. Clip number 1 in front, then 2 then 3.
Clip number 1 was in landscape format, the project is now landscape. But if we look at clip 2, we can see that this clip is vertical but on a horizontal timeline.
If I had placed this vertical clip first, I would have gotten a vertical timeline.
If you want to change the ratio of the project, go to the ratio option below and choose from different types of ratios.
There are several options here. Portrait videos for TikTok and Reels, widescreen for YouTube, or a square format for Instagram. In this case, I’ll keep the widescreen format, which is 16:9. Note that you can go back and export different formats for different platforms.
In the middle, we have the preview screen. To play the video, tap the play button at the bottom of the triangle-shaped screen. Tap again to pause.
When you play the video, you will see the timeline below. The white line is the play head and shows the current position in the video. Swipe this timeline to move backward and forward along the timeline.

The position of the play head in minutes and seconds is displayed at the bottom left of the preview screen. So, the number on the left is the position of the play head, and the total duration of the entire video is on the right.
Below we have a row of buttons to access various features that we will come to later.
There are undo and redo buttons on the right side of the screen. If you want to undo a change, just tap to the left If you want to do it again, tap right.
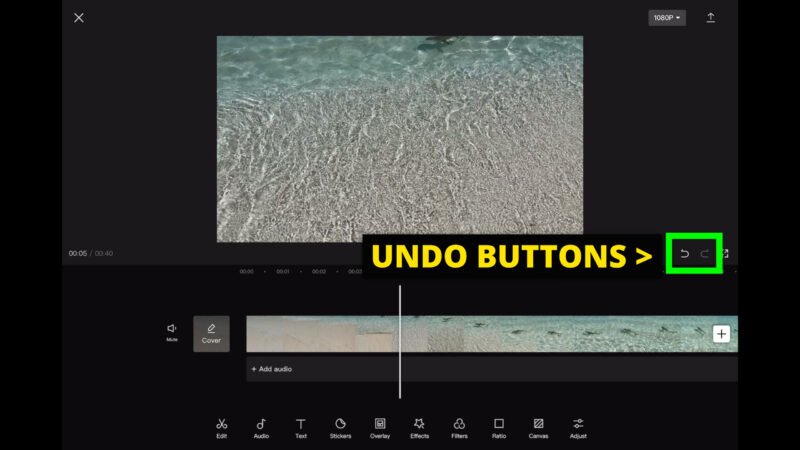
Next to these buttons is a button to switch to a full-screen mode Now we can use full-screen to preview the video. This is useful if you want to watch your video and get a clear view.
Tap the button at the bottom right to go back

If we want to add another clip, we just need to tap on this white button with a plus sign.
You can zoom in and out on the timeline by pinching the timeline with 2 fingers This doesn’t change the edit, it just allows you to zoom in on a specific part of the timeline.
To the left of the timeline, we have 2 more features. First mutes the audio of all videos in the timeline. The second allows us to create a cover for the video. So that will create your basic thumbnail.
And finally, we can add transitions if we tap on the white boxes between video clips. One of the great features of CapCut is all these great preset transitions to choose from. When you choose one you will get a short preview.
We’ll come back to that. To close any window, simply tap the screen away from the window.
How to edit clips in CapCut
In the timeline, our 3 clips are lined up consecutively. If we want to edit a clip, we can move the playhead over that clip and then tap Edit. Or, we can just tap on the clip itself.

At the bottom, we now have a long row of buttons. There are too many buttons that don’t fit on the screen. But you can swipe left and right to access them.
All these buttons allow you to edit and add effects to the selected clip. You can tell which clip is selected because it now has a white border and these two white handles on each end
The handles can be dragged left and right to shorten or lengthen the clip.
How to trim a clip
To trim a clip in CapCut, move the play head to the location where you want to make the cut. Now tap on the Split button, which is on the far left side of the bottom menu.
Now your clip is split into 2 clips and you can treat them as separate clips Adjust the length, add effects, and so on.
Let’s say you had a clip here, that took you a long time to talk to the camera, and you wanted to trim out the bad bits. First, you want to find the good bits. For example, you might want to start the clip as soon as you start speaking, and you want to delete everything before that.
Move the play head to the point where you start speaking. Tap Split. Now before you start speaking, select the clip that contains all the unwanted stuff and tap the trash-can-shaped delete button. The clip is now removed from the timeline and the clip starts exactly where you want it to
Another way to do this is to drag the left handle to where you start speaking. As you drag the handle, you can see where the play head is in the preview window. We can also do this with the handle at the end of the clip.
We also want to remove bits from the middle of a clip. One way to do this is to move the play head and make a cut. Then move the play head to the end of the bad bit and make another cut. Now select the bad bits and delete them. The 2 sections snap together, so it should now go from one good bit to another good bit.
Another way is to make a cut at the end of the bad bit and then drag the handle to the left to remove it.
So we’ll then go through the rest of the clip placing cuts using the split button and then deleting all the bad bits.
How to change clip order
Finally, you’ll be left with a sequence of clips with all the bad bits deleted. But what if they are not in the right order?
All you do is tap and hold on to a clip. The timeline is now changed so that all clips are blocks of the same size. Now just drag the selected clip to the desired position in the timeline.

How to Add B Roll to CapCut
What we have so far is a timeline of our main footage, or what we might call a roll. At some point, we want to add the B roll, which is usually the featured shot or image.
To do this, first, we need to deselect any clip. So tap the screen away from the clip. It provides the main menu below.
Now tap the Overlay button and then tap the Add Overlay button which will open your media sources. Here you can choose a video or photo then tap the add button at the bottom right
You may receive a loading message, indicating that CapCut is only processing clips for editing
On the preview screen, we see the overlaid clip, with the bottom clip visible at the edge. In the timeline, the overlay clip actually appears below the main timeline track. This may seem counterintuitive, as most other editing systems display overlaid clips on top.
But I think it makes sense when you’re editing on a mobile device, because that way the main track is always on top. However, when we deselect the overlay clip and then tap Add Overlay from the menu, you’ll see a change in the timeline.
The overlay is now in a B-roll bubble. That’s not its official name, but that’s what I call it. The length of the overlay is represented by a red line.
To open the overlay timeline again, just tap that bubble.
Each overlay clip you add will be represented by a new bubble. And this is Capcut’s way to save your screen space so that your mobile screen is not cluttered with overlay tracks.
However, you can turn clips from your main track into overlay clips Select the clip, and swipe along the menu until you find the Overlay button. Tap it and now the clip is moved to the overlay track
How to edit overlay clips
Overlay clips work like other clips. Tap to select, slide the handles to trim and you’ll get the same edit menu below. Tap and drag to reposition the overlay clip in the timeline.
Use a 2-finger pinch to expand or shrink the overlay clip. You can also twist your fingers to rotate the clip. When you rotate an overlay clip, you’ll see the rotation angle at the top.
So maybe you want it to fill the screen or you want to make a picture-in-picture effect. However, you can do exactly the same with clips in the main timeline: expand, shrink, or rotate.
Go along your timeline, and add and edit overlay clips or photos where you need them.
But what if we want more than 1 overlay track?
If you place the playhead above the first overlay clip, tap Add Overlay, and add another clip, this new overlay clip will be placed on another track below the first overlay track. If I shrink it down, you can see that I now have 3 layers of media.
I can drag this new overlay item to a different overlay track
When we go back to the original timeline, you’ll see we now have 2 B roll bubbles.
How to Add Titles in CapCut
Move the play head to the point where you want the title to appear and tap the Text button. This opens a menu of buttons for text. If we tap the Add Text button, it places a text box in the middle of the video and brings up the keyboard.
I’m going to type a tutorial here. Above the keyboard is a menu of options: Fonts, Styles, Effects, Animations, and Bubbles. If we tap on Font, we can now choose a font. We can import our own fonts.

Tap the tick next to the text and the text will now appear as a clip on your timeline, like an overlay track. You can edit and move text like other overlay items, and slide handles to trim, split, and drag to reposition.
When we return to the main menu, any text is represented by an orange line above the timeline. But this time no more bubbly.
How to edit the text in CapCut
Select Text in Timeline to bring up the text options menu below. It also brings some tools to the corner of the text box on the screen.
X deletes text. Tap the pencil to change the text. At the bottom left is the Copy button which makes a copy of the text of the next track.
So it’s useful if you’ve created some text in a style you want to use throughout the video. Just copy, move the text to the new position and then change the title text.
And finally, we have the rotate and resize buttons. Tap and hold the button and then slide to resize or rotate the text Tap and drag in the middle of the text to move it to a different position in the frame.
One of the features of CapCut is the huge number of effects and different style options. And there are many, many options for a text that can create all kinds of different-looking text for you to play with
How to edit text style in CapCut
Move the play head over the orange line that represents the text. Tap the text button. You will now see the text box below the main timeline again. Tap it to select text. You can also tap text in the preview window.
In the bottom menu, tap the Style button This opens up various options.

Here you can change the text size and opacity with 2 sliders.
When you tap the eyedropper button, you will now get a circle in the preview window. Drag it around and the text will change color to whatever color is in the center of the circle.
Tap the multicolored button next to it and you can choose a color using the color slider and swipe or tap the box.
If you want a background to help your text stand out, tap Canvas and then choose a color. You can adjust the opacity of this background. Also, you can adjust the size of the box and the roundness of the corners. The bottom two sliders allow you to offset the position of the background box relative to the text.

Effects come with a list of different looks for your text. You can add a 3D look or add a glow to text, for example. If you tap and hold an effect it will save your choice. Tap and hold again to remove from favorites.
How to add animation to text in CapCut
Animation comes with a bunch of preset animations that you can apply. I really like how easy they are to apply and you can immediately see how they look. I use Adobe Premiere Pro for editing and adding text animation is clumsy and slow by comparison.
Tap IN and any animation you choose here will be applied at the start. Then tap Out and any animation you choose here will be applied to the end. Tap LOOP and any animation you choose here will loop in circles for as long as it’s on screen.
Below you can see where the animation has been applied at the beginning and end of the text. There is a blue and a red line with arrows and markers. You can now drag these markers to adjust the length of the animation
If you drag it, you will see the duration of the animation in seconds.
When you adjust the length, the animation will replay in the preview window so you can see how it looks.
If we exit this menu by deselecting the text in the timeline, we will now see these 2 white arrows. And this represents the animation we just applied.
How to Add a Text Speech Bubble in CapCut
The last option is a bubble. Tap it to access preset text styles that also include some sort of background. Many of them are speech bubbles, but not all of them.
These preset will probably look better without the background canvas added to the text. You may need to change the font color so that it works with the background color of the bubble.
With bubbles, the text size is determined by how many words and letters you have in the bubble, as well as how big the bubble is. So you can change the size of the bubble or change the amount of text but you can’t use the size slider under the Style tab.

How to use tracking in Capcut
Another great feature in CapCut is the tracking feature for text. This allows you to attach your text to an object in the frame and then move it around as if it were attached to the object.
Tap to select some text in the timeline. Swipe to the menu to find the tracking button and tap it. This yellow circle appears which marks the area where CapCut will try to track.

Place the playhead where you want to start tracking.
Move the circle over the tracked object so that the yellow dot in the middle is directly over the object. Now use these handles to resize the circle so that it covers the object and not too much. We are basically telling cap cut what to track and what to ignore.

Now tap the tracking button below and CapCut will try to track the object. Play the video and see if your tracking worked. If it doesn’t work as you want, you can reset the tracking and try again. Maybe try changing the size of the circle.
Some shots and some objects will work better than others. An object that contrasts with the background will be easy to track and shots without too much movement will also work well.
How to use a text template in CapCut
CapCut has a text template feature that allows you to use a predefined text style. These templates have complex designs and animations that would probably be impossible to achieve using regular text editing features.
Move the play head to where you want the text to be.
Tap Text and then tap Text Templates. Swipe to find a template that fits what you’re looking for. Again there are many to choose from and many of them are really useful For travel or lifestyle videos, you’ve got chapter titles, tags, and social media.

When you select a template you get a preview of how it will look.
Tap the text on the preview screen to edit the text. Tap the tick to return to the original timeline.
Play the video to see how your text looks. As usual, you can change the length, split, and so on.
If you want to edit the text again, double-tap the text clip in the timeline or the text in the preview screen.
How to Add Transitions in CapCut
Transitions are styles and effects that take us from one clip to another. The most basic of all conversions is a simple cut. This is of course the default transition in any editing system.
But if we want something a little more unusual, we can add an effect that takes us from one clip to the next. Common transitions are things like fades or dissolves, which are used all the time.
Find the edit point between the two clips where you want to place the transition. Make sure both clips are not selected. If one is selected, you won’t see the conversion box.
Tap the transition box to open a window containing the load of the transition. Swipe the menu bar to find conversions under different headings. Currently, popular ones will be trending.
You can swipe the transfer row left and right to find more.
Choose a conversion by tapping it The conversion is displayed in the preview window. There is a slider at the bottom to adjust the length of the transition
If you are happy with it, you can tick the bottom right. If you tap “Apply to All”, this transformation will be applied to all cuts in the timeline.

How to Add & Edit Audio in CapCut
How to add music to CapCut
There are all kinds of ways you can add music to your CapCut video. But here I am going to cover the simplest options.
Back to the main menu, we can see below the video in the timeline that says Add Audio. Tap here to open the audio selector window. Alternatively, you can tap the Audio button in the bottom menu.
To add music, you can either search for a song or artist, or you can tap one of the albums and scroll through the album’s list of songs. Tap to download music and preview it. Tap the plus button to add music to your video.

You can add music from your device. Tap the folder button, select From Device and CapCut will find the audio files on your device. What it finds is displayed as a list below.
I’m just going to pick a track from CapCut’s library. The music file is now placed below the video and will start at the position of the play head. But you can tap and drag this audio file just like video and text files.
Remove audio files
So if I want to start the song at the beginning, I can drag it and it will snap to that position.
If the music is too loud and it drowns out my voice, I can select the file by tapping it, tapping Volume, and then moving the slider to decrease the volume.
Each time you make an adjustment, it replays from the beginning of the audio clip, making it easy to get the right level.
If you want, you can add a fade in or fade out, just tap the Fade button and use the sliders to adjust the length of the fade. There are various other effects you can use on audio here. Some of these are for spoken voices, such as voice effects and noise reduction.
How to Add Sound Effects in CapCut
CapCut has tons of sound effects to download and use in your videos. These are usually fun effects for social media content. For example, great for TikTok, YouTube, YouTube shorts, and Instagram reels.
Also, some of these effects can be added to transitions or camera movements to give more impact.
To add audio effects, tap Audio and then tap the Effects button. It works similarly to adding music. Swipe through the headers menu and choose a header that fits the type of effect you’re looking for.
Scroll through the list. Tap to download and preview. Tap the plus button and the audio effect will be added to the timeline, below any other audio tracks you have.
In this case, it is now below the music I added. Again, you can select, crop, and drag the file to place it on the timeline. Once selected you can adjust the audio level like any other audio file.
How to Add a Voiceover in CapCut
Tap Audio and then tap the Voiceover button. The position of the play head where you want your voiceover to start. There are 2 ways to record voice-over.
The first way is to just tap the microphone button and you will get a 3-2-1 countdown before the recording starts.
The second way is to just tap and hold the mic button. It will start recording immediately and continue recording until you close the button
Whichever path you choose, you’ll now have a new audio file in the timeline with your voiceover. This file will be placed below the video and any other audio files you have.
Now you can add effects. Voice effects Tap, swipe, and then choose an effect CapCut will now play back your voiceover with additional effects.
You can choose different effects and each time you choose one you will see a preview of how it will sound. You can add this effect later. Just select the audio file in the timeline and tap on Voice Effects.
If you want to delete the voiceover you just recorded, tap the back button This will delete the last voiceover you recorded.
Again, these audio files can be trimmed, repositioned, split, and more like any other file.
How to Use Text-to-Audio in CapCut
CapCut has a feature that allows you to create a speaking voice from the text. This feature lets you create a singing voice from the text as well.
Tap the text button and add some text as I showed you earlier. Next to Styles in the Edit Text menu is a button called Text-to-Speech. Tap it, swipe to choose a voice, and tap

Voice will now read your text. If you choose one with Vocalist in the name, it will sing your text with a backing track. So it’s pretty funny.
Tap Apply to All if you want to convert all your text files in the timeline to this voice. Tap to finish. The voice audio now appears as a file on your timeline
Now we can adjust the volume with the slider, the same way we do for other audio files.
How to remove video background in Capcut
One of CapCut’s most powerful features is its ability to remove the background from an image or video clip. You can go about it in different ways depending on the end result you are looking for.
Select the clip you want to remove the background from. Swipe along the menu and tap the cutout button. You now have 3 options to remove the background.
The first option detects a person in the frame and automatically removes the background. The second option allows you to draw your own mask by drawing on the video. The third option is to remove the green screen or blue screen, so obviously, this requires that a green or blue screen be used when filming your clip.
Let’s look at the first option and tap on Remove Background. CapCut can now be set to work on background removal immediately, as well. The longer your clip, the longer it will take.
It’s not perfect by any means, but it works pretty well. The background will now turn black. And if we play it, we can see how it looks.
We can add an outline around the person in the video. Tap the Cutout Stroke button to bring up the various options here.
First, swipe and choose one of the preset options, here. Then you can use the color picker and slider to customize it. Change the outline color, adjust the width, and you can lower the opacity to reduce visibility.
How to add a new background in CapCut
Now that we’ve removed the background we can add a background that has something other than black.
One way to do this is to place this clip on top of the overlay track and another clip or photo behind it. Another option is to go back to the main menu, swipe until you find Canvas, and tap on it.
You now have 3 options. The Color button allows you to add a plain color background. The background button lets you add a textured background and finally, the blur button lets you blur the background but we can’t use it in this situation because we don’t have a background.
So I’m going to add a textured background here.
But what if you want to put a picture or screenshot as a background?
Make sure the playhead is over the clip you just edited. Tap the white plus button and add an image from your media library. This image will now appear next to the clip.
Select the clip and move it to the overlay track, as I showed you earlier. Drag this clip so that it is below the image you added. You can see the image I added in the background.
Now I can use the pinch method to resize the foreground image if I want. Select the overlaid clip and pinch it to shrink it, then move it to where you want it in the frame.
But if we want to zoom in on this background image, shot time. Then we need to use keyframes.
How to use keyframes in CapCut
Select the image by tapping on the timeline track. And, by the way, it works with video clips too.
Bring the play head to the very beginning of the clip. Now tap on the Keyframe button at the bottom right corner of the preview window. Added a keyframe, which appears as a red diamond in clips or photos.
Now if we play the clip we can see the background image slowly zooming in. To delete a keyframe, tap it and then tap the Keyframe button, which should now have a minus sign next to it.
Thus, keyframes can be used to animate zoom or movement. Not just clips, you can also use it for text. You can create, slide left, right or even rotate an image or text
Keyframes can even be applied to audio clips. So you could create a fade, for example.
Move the play head to where you want the fade to start. Add a keyframe. Go to where you want the fade to end. Open the volume control slider and bring down the volume and you’ll see a second keyframe added.
Play the video and you will hear the volume of this audio gradually fade away.
How to Stabilize Your Footage in CapCut
CapCut has a stabilizer feature, so if you have shaky footage, this app can smooth it out and make it look more cinematic and professional. Within reason of course.
Select a clip and then swipe down the menu until you find the Stabilize button. Tap to bring up fixed controls It’s very simple, you just have a slider that allows you to set the amount of stabilization you want to apply.
It needs to crop some footage to stabilize your footage, so it has a safety zone to work with. The higher you set this stabilization setting, the more it will crop.
It starts working on your footage as soon as you set it up. The progress preview is indicated at the bottom left of the screen When it’s done, play the video to see the results.
How to Edit Bits in CapCut
One of the most important aspects of creating a powerful, cinematic video is music. Choosing the right music for your video is key to getting your message across, as music often does 50% of the work.
If you are trying to inspire people with your video, make sure you choose motivational music. If you are trying to encourage people, choose powerful music and so on. Using the right music is so essential, I often select the music before starting any editing project.
But if you’re trying to create a punchy montage sequence, you really need to edit the beat of the music. The makers of CapCut know this, so they’ve added a feature that makes it easy.
Add visual bit references
After you’ve added your music track, tap the audio clip to select it Tap the Beats button in the bottom menu. Now you have 2 choices, you can add beats manually or let CapCut try to detect beats automatically. If your music has a clear beat you should be able to do this with no problem.
Tap on Auto Detect and you will now get a row of yellow dots. Each dot represents a beat of the music. Notice below you have these 2 options: Beat 1 and Beat 2. One beat is faster than the other, so if you want a faster cut, use the faster beat.
One tap to choose which beat you want to use Go back to the original timeline and you’ll see these yellow dots marking the music track.
Now when you slide a handle on a video clip it will snap to these yellow dots So it makes editing music beats much easier. Otherwise, you can spend ages trying to get your cuts in the right place.
How to grade colors in Capcut
Another essential aspect of a professional-looking video is grading your footage. If you’re just using a smartphone footage shot with a regular profile, you may need a few minor adjustments to spice up the look a bit. But CapCut has plenty of options to change the look of your video.
There are 2 main ways to adjust the color of a video in CapCut. The first allows you to adjust the color of an individual clip while the second allows you to create an adjustment layer. This layer can then be used to adjust multiple clips.
To adjust a single clip, tap the clip to select it Now you have 2 main choices here: filter or adjust.
Tap the filter button for presets that give your video a specific look There are loads to choose from so just swipe and try different looks until you find one that looks good on you.
Alternatively, select Adjust if you want to make manual adjustments. You can tap the Adjust button in the main menu, or you can actually switch between filters and adjust on the left side of the menu.
And of course, you can combine the two.
Add a filter
So let’s add this filter and then tap Adjust and now we can adjust certain aspects of the image. Maybe we want to increase the exposure a bit. And let’s tone down the contrast a bit.
The first thing many beginners do when grading their videos is to increase the contrast. I used to do this too because it immediately looks more dramatic. But this is a mistake because blacks and shadows are completely crushed and it can make your video look low quality. Especially since smartphones already add a lot of contrast.
Of course, it depends on the video clip. If we reduce the contrast, we can actually see a little more detail. However, it now looks a little washed out. So I’ll add a little saturation, to make it pop again.
Ok, so this is a way to add color grading. Another way is to create an adjustment layer.
Use an adjustment layer
This time we deselect the video clip. Now tap Filters in the main menu. So you can do the same thing here, switch between filters and adjust to get the look you want.
But when we tap the Done tick at the bottom, it now creates an adjustment layer. So you can now adjust the size of this layer and move it around like any other element in the timeline. The color you’ve worked on will be applied to whichever video clip it’s adjacent to.
So if you want to use this look for the entire video, expand it to cover everything. Or maybe you want to use it in different clips. Tap the Copy button in the bottom menu and you’ll get a copy to the next track.
Instead of making the same changes to each clip over and over again, you can now move it to another part of your edit and it’s a great time saver.
Also, this copy can be edited independently on other levels. If you want basically the same look but slightly different, tap the Polish button which brings up all the controls again. Also, you can go back and readjust the original layer in the same way.
How to add a LUT to CapCut (Desktop).
There are color filters known as LUTs that transform the look of your video in a few clicks. In theory, they are more sophisticated than a simple filter. In CapCut, you can only do this in the desktop version.
Go to the Adjustments tab, tap on the LUT tab, and now tap on Import. Find your LUT and select it. I found these LUTs while signing up for Artlist and they mimic the look of some famous movies, For example, Joker.
Import your LUT and it will now appear in this window along with your other LUTs. Hover over a LUT and you’ll see a plus sign, tap that and it will add an adjustment layer to your LUT.
Expand it to cover the video clips if you want to apply the LUT to.
Now we have Joker’s appearance in this clip. But my face looks a bit weird now because the skin tones are messed up by the LUT.
In the window, at the top right, you can see the LUT is here, and at the bottom is a switch called Skin Tone Protection. Toggle it on and now the LUT is removed from my face.
But it still looks ridiculous because now my face looks bright red.
You can apply LUTs directly to a clip instead of using an adjustment layer. Select the clip, and go to the same adjustment window on the right. Find the LUT with the drop-down menu. Now the LUT is only applied to this clip. Everything else works the same.
How to use templates in CapCut
You can now access CapCut’s popular filter templates directly in the app. At the bottom, there is now a Templates tab. Tap on it to access a huge number of templates, which let you add the kind of filters and effects you know from TikTok.
The templates are organized under headings like Trending, It’s for Valentine’s Day, There are templates for Reels, For TikTok, and more.
Just select a template you like and follow the instructions. They are usually very fast and easy to use.
At this time, this feature is only available to CapCut users in the US. But it will come to Europe and other regions soon.


