
How to Repurpose YouTube Videos for Instagram?
 For all latest news, follow The carefulu Google News channel.
This week, I attended Social Media Marketing World, a big gathering of social media marketers to network and learn about best practices. I wasn’t surprised to see that video creation and editing were a HUGE theme at the conference. The opening keynote was dedicated to the importance of video content, and there was an entire session track about creating videos from scratch. With the rise of YouTube, Instagram Stories, Facebook Live, IGTV, Pinterest Stories, and a bunch of new video channels, marketers are eager to find new tools that speed up video editing workflows.
HOW TO REMOVE THE TIKTOK WATERMARK?
HOW TO SEARCH, SHARE AND DOWNLOAD VIDEO TIKTOK?
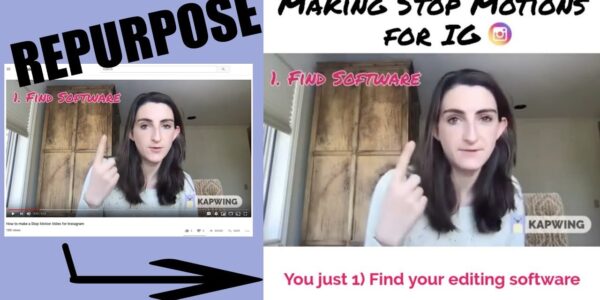
In this tutorial, I want to describe a common question that I heard throughout SMMW19: how to repurpose your YouTube videos for Instagram, Twitter, LinkedIn, and Facebook by making short, meme-style square posts. These short videos have white padding, a custom title above the video, and captions below it. Your output video might look something like this:
For brands managing many channels, this technique is a huge time saver, allowing you to get more bang for the content you’ve created. Meme-style videos get more engagement on social media with an embedded call to action. Plus, the captions help reach social media browsers with the sound turned off.
I’ll show you how to repurpose your YouTube videos for Instagram using a free online video editor called Kapwing. I recommend Kapwing because it’s fast; even professional video editors use Kapwing to add subtitles and resize to square or vertical instead of turning to Adobe Premiere. In addition, it’s highly accessible and intuitive; anyone can use Kapwing without any video editing training or expertise. It’s free to use, so there’s no reason not to try it out.
To make the perfect Instagram post, I recommend 4 steps:
Import your video
Trim out the section for Instagram
Make a square and add a title
Add subtitles
Step 1: Import Your Video
Open Kapwing’s Studio by going to the Kapwing.com homepage and clicking Get Started. Copy the URL of your YouTube video and paste the URL into the box on Kapwing’s import page. You can alternatively upload an MP4 if you have the file on your phone or computer.
In my example, I’m taking a YouTube video that’s 4 mins and 16 seconds long. I copy the URL and paste it into Kapwing. As long as your YouTube videos are shorter than 2 hours, they will import directly onto the digital canvas for editing.
Step 2: Trim Down to <1 Min for Instagram
Instagram feed videos should be less than 60 seconds. So, you’ll want to clip your video so that the full video length is under one minute.
There are multiple ways to trim a video in Kapwing. One way is to seek where you want the video clip to start and end, then use the Split key to cut the end time of your video and delete the extra video clips from the start and end.
Alternatively, you can select the video layer and find the Trim button in the action sidebar. A modal will pop up to guide you on where you want the start and end time to fall for your clip.
Step 3: Make Square and Add a Title
Square videos perform well on most major social networks including Facebook, Instagram, LinkedIn, and Twitter. Use the Resize button to change the aspect ratio of the digital canvas to 1:1. You can either crop your video to square or drag the edges to show the full video with some padding around the edges.
Next, consider adding a title or call to action above your video. The text gives the Instagram browser a reason to tap on your video from the Explore feed and stop scrolling to watch. In Kapwing, you can change the size and position of the text layer and the font, color, outline, and style of the text itself. Kapwing’s font library includes thousands of fonts all of the Google Fonts, and the Studio allows creators to set a custom hex value for the color. In my example, I changed the font to “BEBAS NEUE” and positioned the title above the video.
Kapwing also allows you to insert shapes, images, logos, watermarks, and other visual elements on the canvas. I inserted the Instagram logo using the Images tool to search for the image I wanted. For Instagram Pros, you can also append a custom thumbnail as a separate scene at the beginning of your Instagram video. Since Instagram doesn’t allow custom thumbnail uploads, you want to include it as the first frame of the video. Another tutorial here on custom Instagram thumbnails.
This same technique works for vertical videos for Instagram Story or IGTV if you want to repurpose your YouTube videos across social media platforms. Just choose the 9:16 option from the Resize menu.
Once your video visually looks right, click the DONE button to process your video in the cloud. You can always edit it later to correct typos, cut out a different segment, or make a different size.
Step 4: Add Subtitles
Did you know that 80% of people on Instagram browse with the sound off? If you want to reach a modern audience, you need to add subtitles to your Instagram videos so that viewers can follow along without audio. Kapwing makes it simple with a specific Subtitle Maker tool that burns subtitles directly into your Instagram video. It’s a useful resource for any video going on a platform like Twitter or LinkedIn that doesn’t support subtitles.
Upload your square video to Kapwing.com/subtitles. For a short video, I recommend manually typing out the caption text that you want to appear at the bottom of the video. You can also upload an SRT file or use the Auto-generate button to get AI-powered transcription in minutes, for free.
In the left-hand panel, adjust the style of the subtitle text to make it smaller, change the color or font, or adjust the background style. I turned off the background, made my text pink to match the text in my YouTube video, and changed the caption size to 16px. You can experiment with the different background options wrap, full, and outline to find one that you like.
After you’re done captioning the video, watch it through one full time to correct any mistakes or typos. Then, click “DONE” to process the video and add the subtitles permanently to the MP4.
After your captioned video has been processed, it’s ready for Instagram! Download the MP4 and publish it from your phone, or schedule it for later.
Thanks for reading! I hope that this post helps all the amazing people I met at Social Media Marketing World save time and make a higher-quality video for Instagram by repurposing existing content. As always, let me know if you have ideas for improvement or run into any problems!


